在 i.MX 8QuadXPlus 上使用 Yocto 建置 Linux 系統
前言
最近剛拿到 NXP 的 i.MAX8 開發板。在測試基本功能之餘,也順手把過程記錄下來。本文僅先建置 Yocto 的開發環境並編譯出可開機的映像檔,最後透過 SD 卡開機。
主要內容
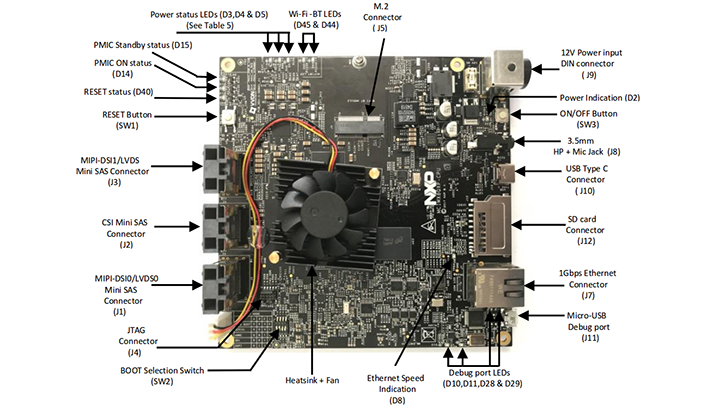
開發板配置
下列是來自官方的圖,我們主要會是以 SD Card 開機,所以目前我們要先確認主板的開機配置
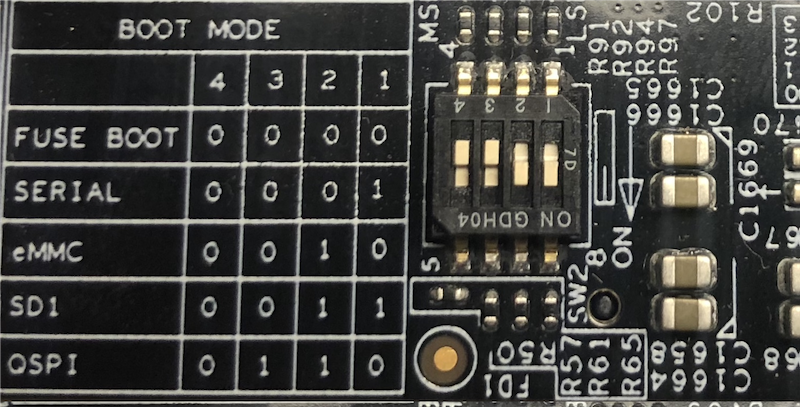
確認 SW2 的配置與下圖相同
https://www.nxp.com/document/guide/get-started-with-the-mcimx8qxp-cpu:GS-MCIMX8QXP-CPU
連接 J11 (Micro USB),我們可以像先前一樣在電腦中看到 tty 裝置。在後續的流程,我們就可以透過它來操作系統。
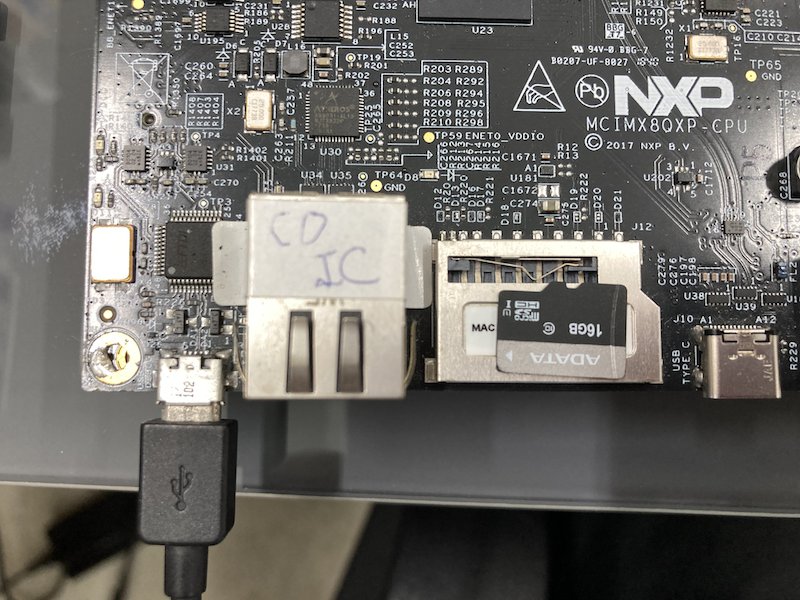
micro USB Debug Port
1screen /dev/tty.XXXXXX 115200
安裝相依套件
1sudo apt install -y gawk wget git-core diffstat unzip texinfo gcc-multilib \
2build-essential chrpath socat cpio python python3 python3-pip python3-pexpect \
3xz-utils debianutils iputils-ping python3-git python3-jinja2 libegl1-mesa libsdl1.2-dev \
4pylint3 xterm rsync curl
5
6mkdir -p ~/bin
7curl https://storage.googleapis.com/git-repo-downloads/repo  > ~/bin/repo
8chmod a+x ~/bin/repo
9export PATH=~/bin:$PATH
建立 Yocto 環境
1mkdir imx-yocto-bsp && cd imx-yocto-bsp
2repo init -u https://source.codeaurora.org/external/imx/imx-manifest -b imx-linux-hardknott -m imx-5.10.35-2.0.0.xml
3
4# 這一步會花蠻多時間的,所以就讓子彈飛一會兒吧~~
5repo sync
6
7DISTRO=fsl-imx-xwayland MACHINE=imx8qxpc0mek source imx-setup-release.sh -b first-build
第一次編譯
1# 移至專案目錄中
2cd first-build
3
4# 開始編譯
5bitbake imx-image-core
6
7# 將映像檔寫入 SD 卡中
8bzcat <image_name>.wic.bz2 | sudo dd of=/dev/sd<partition> bs=1M conv=fsync
測試 UART
NFS
Host 端
在 Host 上安裝 NFS Server ,並進行分享目錄與防火牆設定。
 1# 安裝 NFS Server
 2aptitude install -y nfs-kernel-server
 3
 4# 建立分享目錄
 5mkdir -p /srv/nfs_shared
 6
 7# 設定分享目錄
 8echo "/srv/nfs_shared    *(insecure,rw,sync,no_root_squash,subtree_check)" > /etc/export
 9
10# 設定防火牆 (如果有的話)
11firewall-cmd --add-rich-rule="rule family='ipv4' source address='192.168.0.10' service name='nfs' accept" --permanent
12firewall-cmd --add-rich-rule="rule family='ipv4' source address='192.168.0.10' service name='mountd' accept" --permanent
13firewall-cmd --add-rich-rule="rule family='ipv4' source address='192.168.0.10' service name='rpc-bind accept" --permanent
14firewall-cmd --reload
Client 端
在 i.mx8 開機後,後我們可以使用 ip 來檢視目前的 IP 配置狀況。
1ip -c addr
2
3# 設置靜態 IP
4ip addr add 192.168.0.10/24 dev eth0
1mkdir -p /tmp/nfs
2mount -t nfs 192.168.0.2:/srv/nfs_shared /tmp/nfs
我們就可以存取到 Host 所分享的資料了。
小結
在板子可以開機之後,接下來就要來試著改改看配置啦!